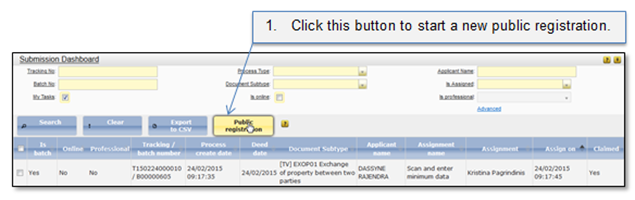
This chapter gives description how to create the submission entry for particular deed/document and enter document/deed data and taxation parameters. To start a new public registration, Submission dashboard list must be opened (menu item “Submission”):
Figure 45 Starting new public registration in the Submission dashboard
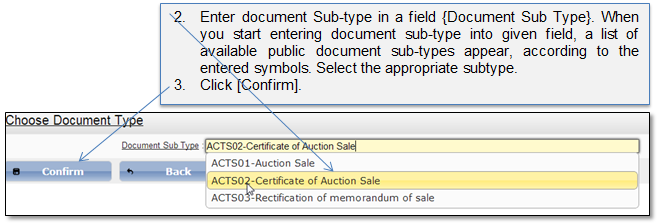
Figure 46 Selecting document type
When you click button [Confirm], submission entry is created:
•Unique tracking number is generated and assigned to the created submission entry;
•Document subtype cannot be changed;
•Submission entry record can be found in a submission dashboard list.
•Submission entry record is assigned to the user who has created it. If the user cannot finish entering and scanning he can unclaim the record and then it can be re-assigned to another submission officer. (to unclaim the submission entry, please follow the instructions given in chapter 3.2.6 Unclaim).
When submission entry is created, scanned document list is opened (Figure 52).
On the top of scanned document list, document main header row is displayed, where basic document information and identification elements (Tracking number) are shown.
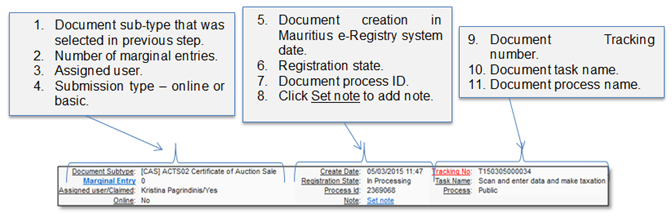
Figure 47 Document header row
Below the document header row, document registration tabs are displayed. To proceed with the document registration, you have to go through all the document registration tabs and fill them with required information. The tab that is opened at the moment is marked with grey font color (e.g. in the picture below, the tab “Scanned document” is opened).

The following sub-chapters give detailed instructions of how to fill in every tab:
•Scan and upload document – 1.1 Scan document;
•Enter deed data – 1.2 Enter deed data;
•Add linked registrations – 1.3 Add linked registrations;
•Enter taxation data – 1.4 Enter taxation data;
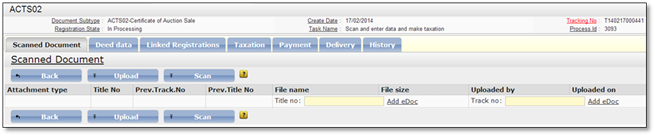
Figure 48 Scanned document list